Circuit Biscuits is a hands-on electronics workshop for curious children, parents, teachers, and makers. You build one small project at a time with a real breadboard, a Bluepill microcontroller, and affordable modules you can find from Amazon or other online electronics shops.
The site is part lesson book, part live control room, and part playground. Start with simple wins like blinking LEDs, then move into sensors, displays, motion, sound, automation, and the engineering habit that matters most: try something, observe what happened, improve it, and try again.
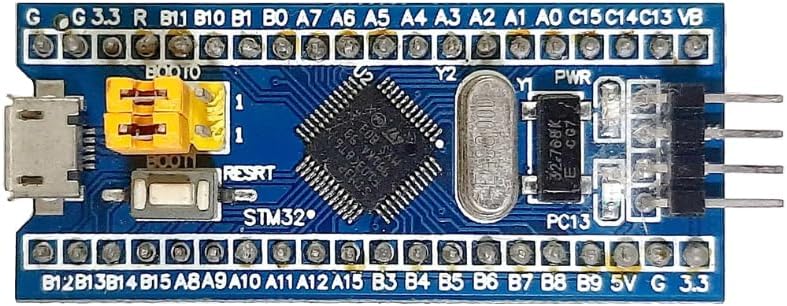
The Bluepill is the small blue board at the heart of this course. It is a real microcontroller development board, which means it can read sensors, control outputs, talk over USB and Bluetooth, and run real embedded firmware.
We chose it because it is low-cost, widely available, and powerful enough to do meaningful projects without pushing families or schools toward expensive kits. For children, it feels like a tiny computer that can make lights, displays, and sensors come alive. For parents, it offers a practical way into genuine electronics and engineering rather than a closed toy system.
It keeps the cost barrier low, so more learners can get hands-on time with real hardware.
It uses the same kinds of pins, protocols, timers, and firmware ideas found in real embedded systems.
It works well with displays, motion sensors, distance sensors, and wireless modules as the course grows.
This course is here to help you explore real embedded systems in a way that is practical, affordable, and hands-on. You do not need expensive kits or a complicated setup to get started. With a low-cost Bluepill board, simple add-on modules, and clear step-by-step tools, you can see how hardware and software work together in real life.
As you build, test, wire, debug, and observe, you will grow real confidence and learn to think like an engineer. For families, teachers, and hobbyists, that means a learning experience that is challenging, rewarding, and grounded in genuine electronics and computing without a high cost barrier.
Open your live dashboard to control the board, edit the matrix display, watch telemetry, set up Bluetooth, send commands, and try automation.
Pick a scene, drag trigger and action ideas into rules, then test distance, tilt, timer, and feed reactions in a playful browser world.
Choose a scene, make simple rules, and test how sensors, time, words, and board actions can change what happens next.
Browse lessons, device guides, teacher notes, and the web app guide whenever you want extra help or a deeper explanation.
Meet the main parts of your kit through photo cards, then jump straight into the matching device guides.
Arrange the Bluepill and modules on a virtual breadboard, inspect pin colours, and build lesson wiring layouts visually.
Take a guided tour of the dashboard so you know what each panel does before you begin.
Update your board from the browser when it is in DFU mode, without needing to open a terminal.
Connect your Bluepill board over USB, then open the Dashboard when you are ready to interact with it.
Use Clock, LED, and LED Matrix first so you can quickly check that your board is alive and responding.
Open the Docs Library when you want help, or move to the DFU Flasher when your board needs a new firmware image.
